A garage can either shorten your pre-trip packing routine to 15 minutes or turn every weekend departure into a scavenger hunt. For homeowners thinking through How to Store Camping Gear in Your Garage (Bins, Coolers, Tents & Seasonal Swaps), the difference comes down to moisture control, category discipline, and a layout that matches Salt Lake City’s climate.
This guide explains why garage storage fails, how to build a durable storage system with custom-designed garage systems and professional installation when needed, and how to protect tents, coolers, soft goods, and seasonal gear without wasting floor space.
Why Garage Storage Fails (And What Works Better in Salt Lake City)
Most failed garage organization starts with pile storage, where gear lands wherever there is open floor and stays there until the next trip. That habit damages equipment because moisture gets trapped, dust settles into fabrics and zippers, and UV exposure near garage doors or windows accelerates coating breakdown.
In Salt Lake City neighborhoods like Sugar House, The Avenues, and Capitol Hill, garages also see sharp temperature swings and door-open heat loss, which makes condensation around garage door tracks more common than people expect. In Salt Lake City, dry summers do not eliminate risk because garages still see spring runoff moisture, winter condensation, and road salt and grit tracked in from the Wasatch Front. Perfect Garage Storage has seen that mildew prevention depends less on climate labels like “dry state” and more on whether gear is stored clean, dry, elevated, and separated by use.
A poor load-out workflow also costs money because hidden bins create duplicate purchases and damp fabric shortens the life of tents, sleeping bags, and camp chairs. Better results come from garage shelving, closed garage cabinets where needed, and a clear path from camp zone to vehicle, which is the core principle behind the storage planning used by Perfect Garage Storage Solutions and other install-based systems.
Set Your Storage Standards Before You Buy Bins
Start with decluttering, then define categories before buying storage bins, because random container sizes create unstable stacks and wasted shelf depth. A durable storage system works best when every item belongs to one of eight groups: shelter, sleep, kitchen, water, safety, camp furniture, repair, and grab-and-go.
If something has not been used in two seasons, set it aside and donate unused gear to free up space for what you actually take to Big Cottonwood Canyon or Little Cottonwood Canyon. Choose one label format and keep it consistent across the entire garage organization plan. Large text plus a simple icon on two sides of each bin reduces decision time, which matters more on a dark departure morning than any premium container featur
Step 1: Map Your Garage Into Zones (So Gear Doesn’t Drift)
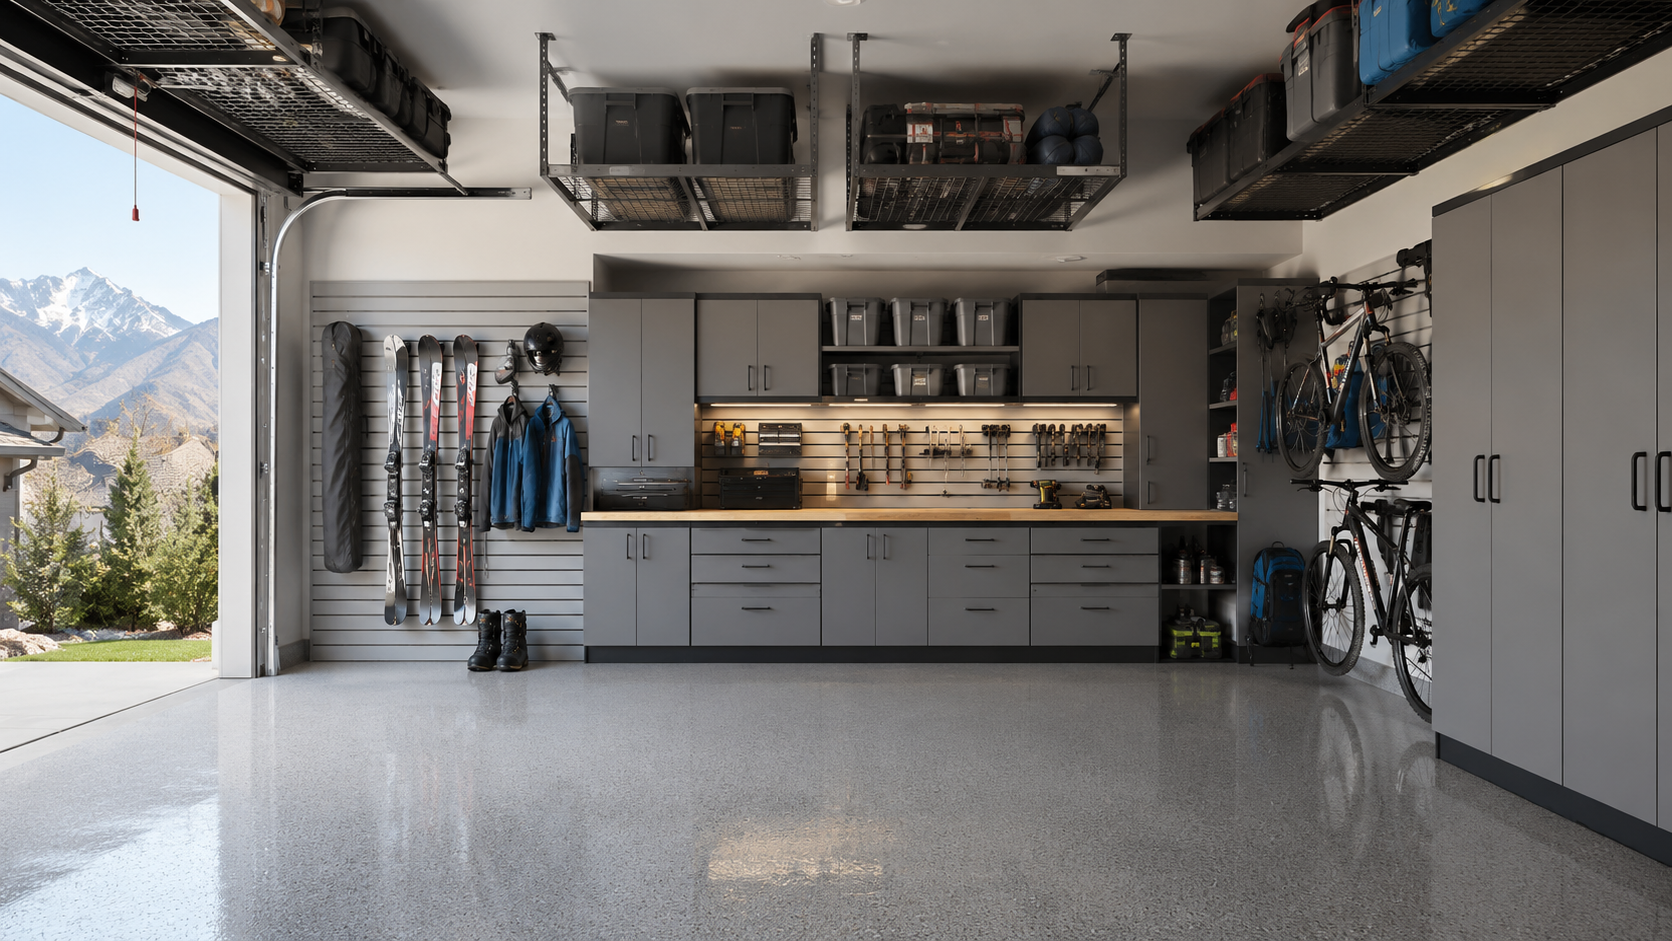
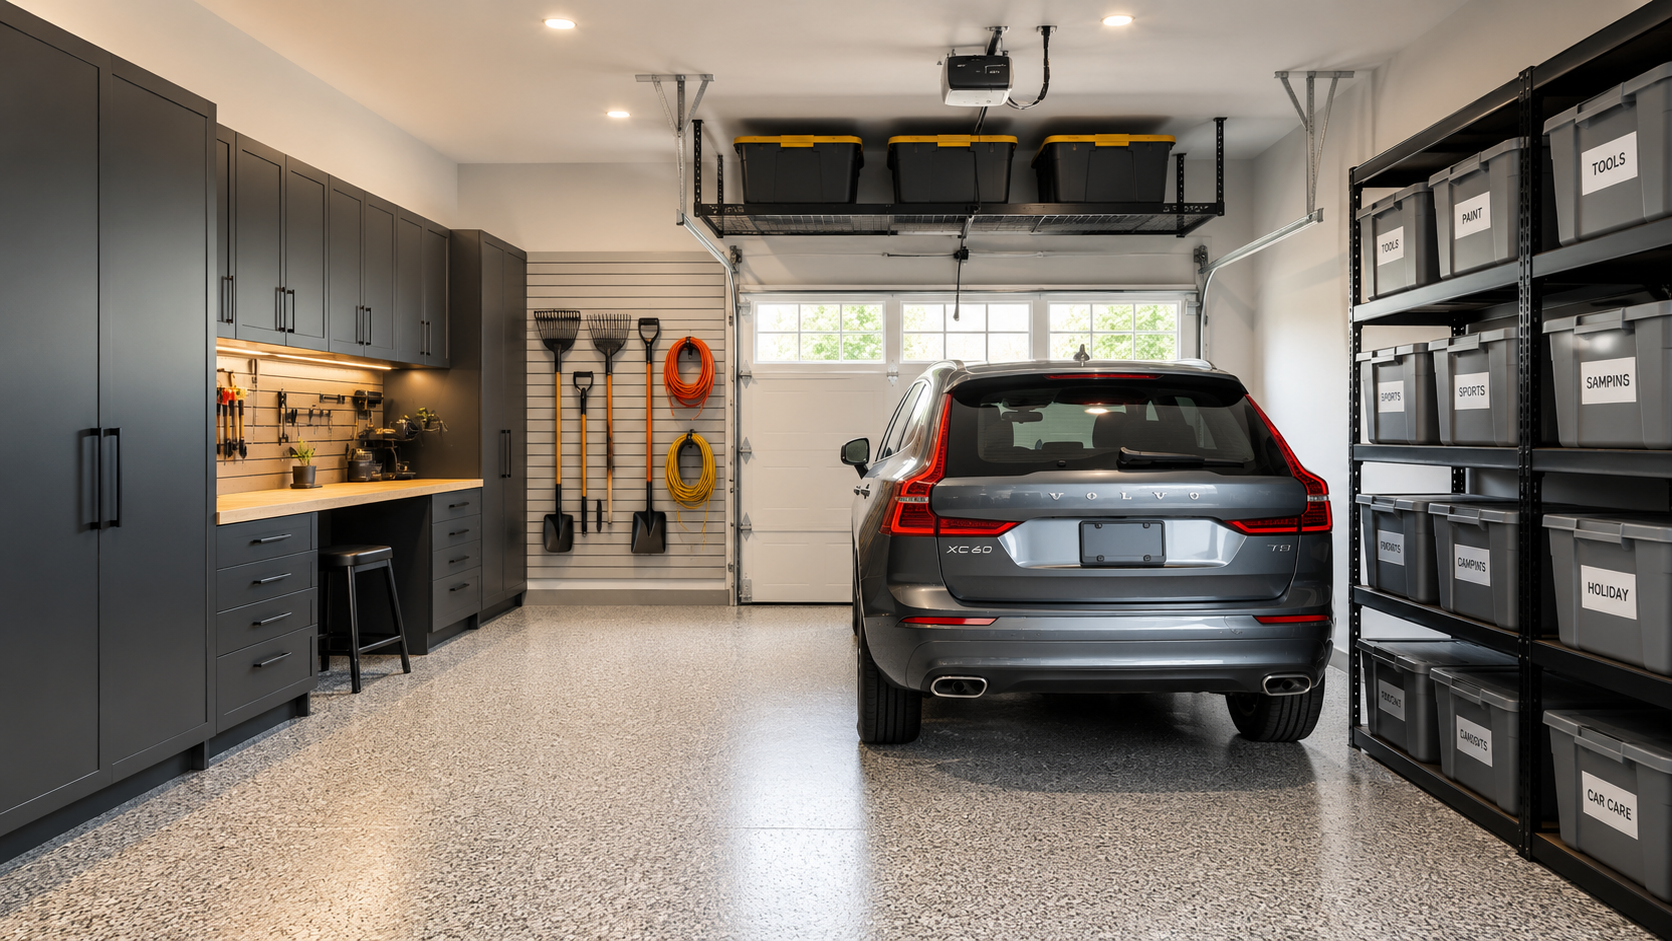
A dedicated camp zone prevents outdoor gear from spreading into parking lanes, ski storage, and trash access. The most durable layouts keep heavy totes between knee and chest height, because lifting a loaded kitchen bin from overhead storage is where both injuries and broken lids happen.
Custom-designed garage systems can help here because they account for vehicle swing space, door clearance, and where garage door tracks limit overhead storage rack placement. Salt Lake City households often need one garage to handle camping, skiing, biking, and daily parking at the same time. That is why fully-customized garage designs with 3D renderings often outperform improvised layouts: they expose traffic conflicts before shelves and hooks are installed, especially near garage doors and side entries.
Keep one walkway clear from the house door to the vehicle and another to the main storage wall. Winter mornings punish cluttered garages because snowmelt, darkness, and rushed loading amplify every layout flaw.
A Practical Zone Layout for Salt Lake City Outdoor Households
Use the wall zone for hook and rack systems (packs, lanterns, water jugs, and camp chairs) on hooks or slatwall-style panels. Use the shelf zone for lidded bins, stoves, and the trip-ready tote that holds the items you want to grab first.
Integrate a Bike Zone Without Collisions
Vertical bike storage frees floor space that camp totes need, especially in family garages with multiple bikes. A pivoting rack approach like the systems shown in this bike storage resource works because it separates handlebars and pedals from fabric gear that can snag or tear.
Keep muddy bikes, wet boots, and snow-season gear away from tents and sleeping systems. Dirty gear and fabric gear age differently, so combining them creates avoidable moisture and abrasion problems.
Step 2: Choose the Right Containers (Bins, Boxes, and Labels)
Heavy-duty bins and clear plastic storage containers outperform cardboard boxes in garages because they block dust, tolerate temperature swings, and stack safely on garage shelving. Heavy-duty bins outperform cardboard in garages because they block dust, tolerate temperature swings, and stack safely on garage shelving. The right stackable containers also improve load-out speed because one-person lift targets force you to keep each tote at a manageable weight.
Opaque bins work better than clear ones when shelves sit near windows or the garage door, because UV exposure degrades plastics and coated fabrics over time. Labels matter more than transparency in most garages, since visible clutter makes retrieval slower once bins start to multiply.
For families, simple color-coding (one color per person or per activity) makes the storage system easier to maintain without re-labeling every season. Create one consumables bin for fuel accessories, matches, water treatment, batteries, and expiration-dated supplies. A dated card taped inside the lid turns replenishment into a quick inspection instead of a memory test.
A Simple Bin Taxonomy That Speeds Up Packing
Assign one bin per function: camp kitchen, lighting and power, repair tools, tent stakes and cordage (including guy lines), and first aid kit supplies. Functional bins reduce packing errors because you load by activity, not by whatever happened to fit in the nearest box after the last trip.
Keep a small repair kit in the repair bin (patches, seam sealer, zipper lube, and spare buckles). Keep a small lost-and-found tray for spare buckles, patch kits, and odd tent stakes that appear after cleanup. That tray prevents the common cycle where one missing part makes an otherwise complete shelter system unusable.
Labeling That Works From 6 Feet Away
Place labels on two sides and the lid in the same position every time. Add a short contents list inside the lid so anyone in the household can repack the bin without guessing.
Step 3: Store Tents the Right Way (Dry, Loose, and Protected)
A tent should never go into long-term storage with hidden moisture in seams, corners, or webbing. Mildew smell is not only a nuisance; it often signals coating damage, and hydrolysis can permanently weaken waterproof layers.
Store the tent body and rainfly loosely in a breathable storage sack rather than the factory stuff sack. Long compression creates creases, traps residual moisture, and increases coating stress, while a shelf location keeps the fabric off the concrete floor where moisture can wick upward.
Keep tent poles and tent stakes in a separate labeled pouch, and coil guy lines so they do not knot in the field. That small separation prevents abrasion holes and also makes field repairs faster because you can inspect poles, ferrules, and stake count without unfolding the tent.
Fast Drying Tips for a Salt Lake City Garage
Hang the fly and tent body with airflow and use a fan or a small dehumidifier during rainy spring periods when drying stalls indoors. Hang the fly and tent body with airflow and use a fan during rainy spring periods when drying stalls indoors. In garage planning work, a 1-2 day design turnaround is useful because fast visualization helps households reserve a proper drying zone instead of treating wet gear as an afterthought.
Spot-clean sap and Utah red dirt, then dry the tent again before storage. Dirt holds moisture at the fabric surface, which is why a tent that feels dry can still mildew in storage.
Common Tent Storage Mistakes to Avoid
Do not store a tent damp after a weekend trip, because mildew can establish within days in a closed bag. Do not leave long-term tension on shock-corded poles when possible, because relaxed storage reduces stress on elastic and joints.
Step 4: Coolers and Camp Kitchen Gear (Odor-Free and Ready to Go)
Coolers need full cleaning and complete drying before storage, and the lid should stay slightly cracked to protect the cooler gasket and prevent stale odors and gasket mildew. A sealed, damp cooler becomes its own humidity chamber, which explains why odor problems return even after a quick rinse.
Keep all kitchen gear in one tote: camp stove, cookware, utensils, wash kit, trash bags, and spices. A single kitchen bin protects the most frequently forgotten category because cooking gear tends to scatter across drawers, pantry shelves, and random garage corners.
Store fuel canisters and other flammables like propane and white gas in a safe, ventilated location that follows manufacturer guidance. Store fuel canisters and other flammables in a safe, ventilated location that follows manufacturer guidance. Small parts organizers work well for lighters, stove adapters, mantles, and spare O-rings because one missing connector can disable the entire cooking setup.
Make a “Camp Kitchen Reset” Checklist
After each trip, restock soap, sponge, paper towels, and any filter backflush tool you use. A laminated inventory checklist inside the kitchen lid turns cleanup into a repeatable process and reduces last-minute grocery-store replacements.
Step 5: Hang and Protect Soft Goods (Sleeping Bags, Pads, Chairs, Packs)
Sleeping bags should be stored uncompressed in a large breathable sack, not a compression sack, or in a protected cabinet or closet zone. Loft is insulation, so long-term compression reduces warmth and shortens the useful life of down and synthetic fill.
Air out sleeping pads, quilts, and camp chairs after every trip before they return to storage. Sleeping pads can hold interior moisture around valves, and chairs last longer when hung off dusty floors instead of folded under heavier gear.
Use hooks or racks for packs and keep all soft goods away from direct sunlight. UV damage is slow but cumulative, which is why garage windows and door-edge light exposure matter more than many households expect.
Wall Systems vs Pegboard: What Holds Up Long-Term
Pegboard works for lighter accessories, but heavier camping gear benefits from rated rails and hook and rack systems such as StoreWALL, Flow Wall, or Monkey Bars. Adjustability matters because family gear changes over time, especially when kids’ equipment, larger tents, or extra camp chairs enter the mix.
Seasonal Swaps for Salt Lake City: Camping, Ski Season, and Shoulder Months
Camping gear storage works best when current-season gear sits front and center and off-season gear moves upward or deeper into the garage. Seasonal rotation is not cosmetic; it reduces handling damage because you stop moving the same bins every time another sport comes into season.
For Salt Lake City homes across the Wasatch Front, an overhead storage rack is ideal for bulky off-season items, and steel shelves with a powder-coat finish (often in colors like Granite Gray) hold up well against scuffs and seasonal grime. Keep a separate winter roadside kit so camping bins do not get raided for headlamps, gloves, and first aid during snow season.
A Simple 3-Tier Access Plan
Tier 1 holds weekly-use items such as headlamps, first aid, cooler, and the kitchen bin. Tier 2 holds tents, sleeping systems, and camp chairs, while Tier 3 holds duplicates and low-frequency gear.
Local Timing Cues
Shift camping access forward after late snow and spring storm cycles taper in the valley. Shift back before sustained fall freeze-thaw periods, when ski gear and emergency supplies need the easiest reach.
Quick Example Setup: A Two-Shelf System + Wall Hooks + One Overhead Rack
A strong starter layout uses two heavy-duty steel shelves, one wall hook zone, and one overhead rack. This arrangement covers the core categories without overbuilding, which suits garages that still need room for cars, recycling, and household overflow.
Put kitchen, lighting, repair, and water bins on the shelves, with daily-access items at mid-height. Use wall hooks or rails for chairs, daypacks, lanterns, and a wet-dry separation zone, then reserve overhead storage for low-frequency soft goods.
Stage bins by the garage door before each trip and load by category: kitchen, sleep, then shelter. That sequence mirrors campsite setup order, so unloading becomes more efficient at the destination too.
What to Measure Before Installing Anything
Measure vehicle clearance, garage door track height, and walkway width before adding shelves or racks. Also measure bin dimensions, shelf depth, and your safe lifting height, because a storage plan fails when good equipment is placed where nobody wants to lift it.
Common Mistakes That Ruin Gear (And How to Prevent Them)
Fabric gear stored on a concrete floor absorbs risk even when it looks dry, because concrete can transfer moisture and grime into bags, tents, and chair feet. Good moisture control starts with elevation, airflow, and regular inspection, not with deodorizing products after damage appears.
Another common failure is mixing categories until small essentials disappear, including batteries, lighter parts, and stove fittings. A stable home for each item matters more than a perfect-looking garage, because retrieval speed is the test that exposes whether a system works.
Pest control belongs in every garage organization plan. Food odors in coolers, crumbs in kitchen totes, and unsealed snacks attract insects and rodents that damage fabric and contaminate supplies.
A 10-Minute Post-Trip Reset
Dry, wipe, and air out every major item before storage. Restock consumables, note damaged gear on a replacement list, and return each piece to its labeled home so the system stays reliable all season.